11.01.2013

Happy "How To Train Your Dragon" Halloween

I grew up in a house where my mother made all of my costumes. I'm not sure I realized how much I loved that until I had kids of my own. While I may not be a seamstress, I can sew a straight line and that means that when my daughter asks me if she can be "Toothless" for Halloween, I can accommodate that. I started searching for ideas on line in August. I ran across this wonderful post by a woman named Emily, and I immediately posted a comment about how inspired I was. She wrote me back and very kindly kept in touch with me while I attempted to recreate her masterpiece from 2011.

Ok, so I love that I can make costumes for my kids, but wow, this one came close to putting me over the edge. It took a month to make it, which is kind of funny considering that she only got to wear it twice, but I am really proud of it.


I think one of the most wonderful things about it is that it completely comes apart which was key for her Pre-school Parade. Once they show off their costumes, they need to be able to function the rest of the day, so I made sure she could do that. The wings are worn like a back pack. The tail is attached with a belt. The head has a piece of velcro attaching it to the hoodie and comes off easily leaving her with black leggings and a toothless hoodie. This also means that throughout the rest of this year, she can continue to put parts of it on and run around the house. (Kind of makes the whole labor intensive process more worth while actually.)

And not to overshadow my son's choice in costumes, here he is in all of his glory as Ladybug Girl.


I adore both of their spirits and their personal choices and they looked adorable.

Hope everyone had a wonderful Halloween.


9.15.2013

Studio Make-Over

Months ago, a friend of mine moved out of her current home and into a furnished studio apartment due to circumstances beyond her control. It wasn't an easy move, and her new place was really cute, but when I went to visit one night, have a glass of wine and catch up, it occurred to me that while her new home was cozy, it wasn't "her." If there is anything I have learned from my own "circumstances beyond my control" kind of moves, one needs to feel at home while picking themselves up by their bootstraps. With my kids getting older, I have a little more free time to design again and I decided that her apartment would be my very first design "project" since I became a mom.

I had a $300 budget and managed to pull it off for $390 + donated supplies I already had that were collecting dust in our garage and neglected things my friends dug out of their own places and handed off to me. I spent about 3 months researching, DIYing, shopping, Craigslisting and designing a place I thought she would feel at home in and then I called my friend Rob and asked if he would help me put it all together with a payment of alcohol and the sheer pleasure of spending the day with me. Thankfully he has a sense of humor and said "yes."


It took a lot of work and re-adjusting and figuring out, but in the end it all turned out the way I wanted and most importantly my friend's comment was "I am never moving out." I couldn't ask for a better compliment. 

So here it is. The before and after's. Please excuse the random crescent shadow in the middle of some of the images. The downfall to shooting with a super wide and a built in flash. You get the idea though... it doesn't look like the same apartment.

Before Front Entrance

After

Before view from just inside the entrance.

After

Before view from the kitchen

After. 
She needed some separation in her space. I created a bedroom with an Ikea Hack of a 5x5 Expedit, an old school Craigslist Ikea shelf that I painted white and contact papered, and some plumbing and electrical supplies to create the curtain rods. 

Before view from where the TV used to be.

After.
She can now close herself off into her bedroom for some peace and privacy. The grey curtain on the left of the picture slides to the right and the TV swivels so she can watch TV in bed as well as on the couch.

Before view from where the dining room was.

After.
I hacked the Ikea Expedit to create this TV unit. the base that the TV stands on swivels 360˚ and allows her to watch TV from both rooms. 

Detail of the division of space. I love how cozy it all turned out.

As a Stay At Home Mom, you tend to forget that you can do anything more than be a mommy some days and while this project was time consuming and exhausting, it was the most rewarding thing other than being a mom that I have done for a long time. It is a brave thing to let a friend into your apartment and let them tear it apart to make it new, so I am grateful for the opportunity and I am so happy she loves it.

9.11.2013

Flower String Lights

In an attempt to keep with the low budget of my latest design project, I decided to do a lot of DIY projects. One of them, which I will be doing for myself soon since I fell in love with it, is flower string lights. I bought a set of white wire mini string lights from Target for $5.


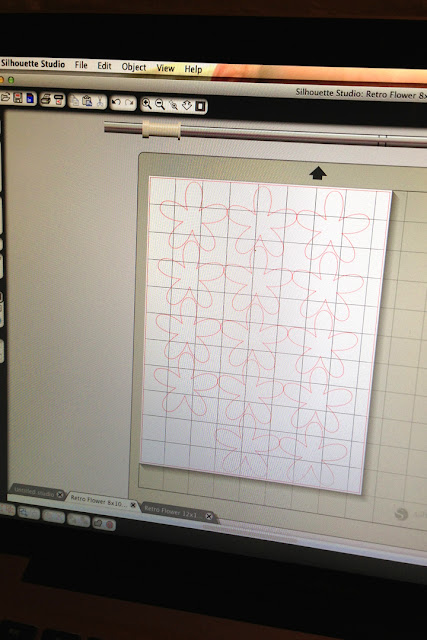
Then I bought a bunch of vellum for around $.99 - $1.99 each sheet. Half of the sheets were frosted with a pattern and the other half were a sea glass color. I own a Silhouette Cameo so I simply found a "retro" flower on line, dragged it into the Cameo program and traced the outer edge. I then duplicated it over and over and began cutting.


I think of all the things I've cut by hand over the years. Geesh. This thing is a time saver for sure. Once I cut out all of the flowers, I punched a hole in the middle of each.


Then I poured a cocktail, put in one of my favorite movies (Star Trek was tonight's choice), and one by one, pulled each bulb out and placed 2 flowers onto each bulb.


It is time consuming and I warn you that you should do this with the lights plugged in, but it is worth it in the end.


Total cost was about $15.

8.29.2013

I swear all I've been doing is crafting...

...and being a mom, but when you put those two together, you find that you tend to just want to get the project done and forget to shoot it or document it. So here I give you my latest which is only a piece of a much larger project that I will post in September.


I wish I had documented it all, but alas, this is all I have. A free lamp from a friend, some spray paint, card stock, spray adhesive and some ribbon. It took about 6 hours total to finish it, but I am happy with the results and it will fit in nicely with the room I am designing for a friend. 

1.19.2013

Milestones

I have seen this project all over Pinterest and Pottery Barn which means that I automatically went "of course I can do it cheaper and of course I can do it myself." And I did. All you need is:

1 1" x 6" x 6' piece of lumber
1 can of polyurethane
1 roll of vinyl numbers from Etsy or DIY'd from your own Silhouette Cameo
2 eye hooks
2 hooks
1 tape measure

It took an afternoon to do this. I simply sanded the edges of the lumber, applied one coat of polyurethane, stuck down the ruler numbers I bought from Etsy, applied one more coat of poly, attached 2 hooks to the top and then two eye hooks to our beam. Then we measured 1 foot from the floor and hung it appropriately. 


The greatest thing about this is that if we move, we can take it with us as opposed to all of those marked up doorways that get painted over when families move.

Dragons

Sometimes when your daughter loves dragons, you have to get creative. Thanks to the Silhouette Cameo, making my 3 year old's bedroom a virtual dragon's den was easy (relatively speaking that it... these actually took a lot of work).